Ubuntu中之fcitx行列輸入法預設的字碼表和Windows下的排列方式差很多,在輸入上會不太習慣,因此從行列輸入法官方下載gcin的字碼表和老刀所製做的gcin字碼修改成fcitx的字碼表。加入w0~w9的符號輸入。
安裝fcitx行列輸入法
sudo apt install fcitx-table-array30
下載字碼表
原始檔
fcitx字碼表
如果下載原始檔,則要進行下列兩個動作,如果是下載字碼表,則直接進行更新字碼表動作
安裝fcitx工具
sudo apt install fcitx-tools
由原始文字檔產生字碼表
txt2mb array30.txt array30.mb
更新字碼表位置
/usr/share/fcitx/table/array30.mb
修改候選字數由5改為10,在選字上與windows一樣
Search This Blog
Showing posts with label Ubuntu. Show all posts
Monday, January 1, 2018
Sunday, January 3, 2016
[Solved]grub fail to boot Windows 10 with Ubuntu 15.10/16.04
Grub2雙重開機要進入Windows 10時,出現
error: 無法找到 'grub_efi_find_last_device_path' 符號
or
error: symbol 'grub_efi_find_last_device_path' not found
grub-efi-amd64的版本為2.02~beta2-29ubuntu0.3(Ubuntu15.10) 2.02~beta2-36(Ubuntu16.04)
解決方式
重裝前一版本2.02~beta2-29ubuntu0.2即可正常進入Windows 10
下載2.02~beta2-29ubuntu0.2版本deb檔
https://launchpad.net/ubuntu/wily/amd64/grub-efi-amd64/2.02~beta2-29ubuntu0.2
安裝
dpkg -i grub-common_2.02~beta2-29ubuntu0.2_amd64.deb
dpkg -i grub2-common_2.02~beta2-29ubuntu0.2_amd64.deb
dpkg -i grub-efi-amd64-bin_2.02~beta2-29ubuntu0.2_amd64.deb
dpkg -i grub-efi-amd64_2.02~beta2-29ubuntu0.2_amd64.deb
如果不要自動被升級grub,可以執行下列命令
sudo apt-mark hold grub-common grub-efi-amd64-bin grub2-common grub-efi-amd64解除不升級sudo apt-mark install grub-common grub-efi-amd64-bin grub2-common grub-efi-amd64
Solution:
Downgrade version of grub-efi-amd64 to 2.02~beta2-29ubuntu0.2
https://launchpad.net/ubuntu/wily/amd64/grub-efi-amd64/2.02~beta2-29ubuntu0.2
Installation:
dpkg -i grub-common_2.02~beta2-29ubuntu0.2_amd64.debdpkg -i grub2-common_2.02~beta2-29ubuntu0.2_amd64.debdpkg -i grub-efi-amd64-bin_2.02~beta2-29ubuntu0.2_amd64.debdpkg -i grub-efi-amd64_2.02~beta2-29ubuntu0.2_amd64.debdisable upgrade grubsudo apt-mark hold grub-common grub-efi-amd64-bin grub2-common grub-efi-amd64
enable upgrade grub
sudo apt-mark install grub-common grub-efi-amd64-bin grub2-common grub-efi-amd64
package depends on
grub-common_2.02~beta2-29ubuntu0.2_amd64.deb
grub-efi-amd64-bin_2.02~beta2-29ubuntu0.2_amd64.deb grub2-common_2.02~beta2-29ubuntu0.2_amd64.deb
grub-efi-amd64_2.02~beta2-29ubuntu0.2_amd64.deb
reference:
https://bugs.debian.org/cgi-bin/bugreport.cgi?bug=808366;msg=2
http://askubuntu.com/questions/737105/windows-8-stopped-booting
Sunday, November 20, 2011
[Ubuntu]How to enable exFAT
如果你的磁碟是在Win7下格式化為exFAT,在Ubuntu下是無法讀取的,必須要安裝下面的套件就可以掛載讀取了
sudo apt-add-repository ppa:relan/exfat
sudo apt-get update
sudo apt-get install fuse-exfat
Reference:http://apcmag.com/how-to-enable-exfat-in-ubuntu.htm
sudo apt-add-repository ppa:relan/exfat
sudo apt-get update
sudo apt-get install fuse-exfat
Reference:http://apcmag.com/how-to-enable-exfat-in-ubuntu.htm
Monday, July 11, 2011
[Ubuntu]SVN Client

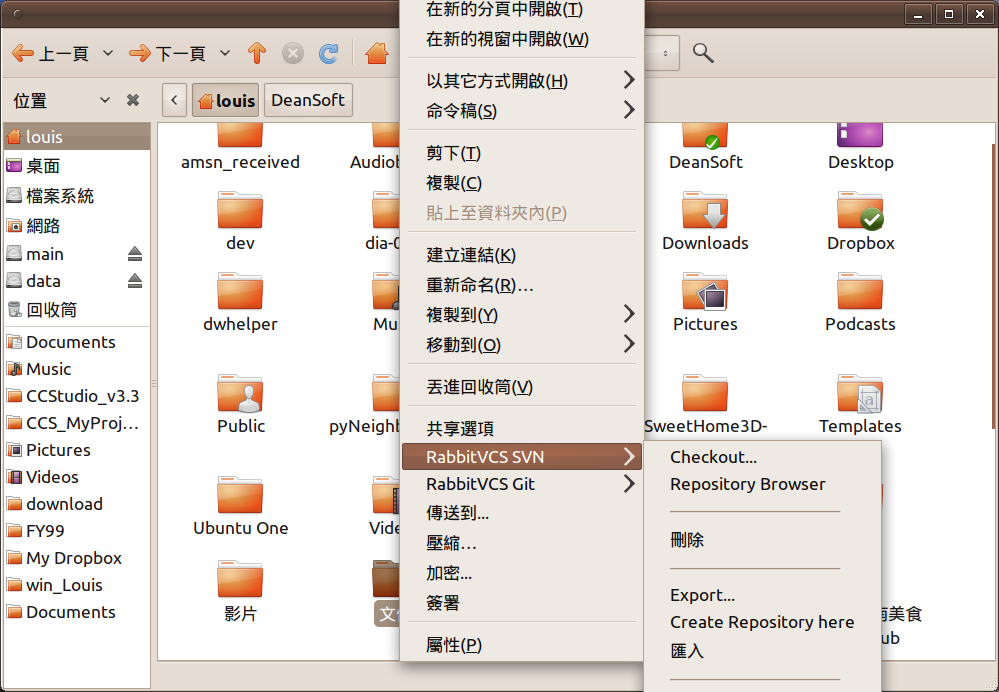
在Windows平台常用的SVN Client是TortoiseSVN,而且TortoiseSVN有跟右鍵選單(Context menu)整合,在使用上直覺又方便,在Ubuntu上現在也有高手寫了類似的RabbitCVS,同樣也是跟右鍵選單(Context menu)整合,在檔案管理員介面上也一樣可以看出檔案的狀態。
安裝方式如下:
sudo add-apt-repository ppa:rabbitvcs
sudo apt-get update && sudo apt-get install rabbitvcs-nautilus
Reference:http://superuser.com/questions/146001/svn-client-for-ubuntu-with-context-menu
Friday, July 8, 2011
[Ubuntu]字型檔
Font:Arial, Arial Black
sudo apt-get install ttf-mscorefonts-installer
Font:Garamond
Ubuntu:Apple Garamond
sudo apt-get install texlive-font-extra
sudo apt-get install ttf-mscorefonts-installer
Font:Garamond
Ubuntu:Apple Garamond
sudo apt-get install texlive-font-extra
Tuesday, February 15, 2011
[Ubuntu]Eclipse Big5中文顯示亂碼-解決方案
Code Section
1. 修改Ubuntu支援語系
加入
zh_TW.Big5 Big5
2.重開Eclipse
Poject->Property->Resource->Text file encoding
手動輸入Big5
Reference:
http://www.pctartarus.com/?tid-1856/
1. 修改Ubuntu支援語系
sudo gedit /var/lib/locales/supported.d/zh-hant
加入
zh_TW.Big5 Big5
2.重開Eclipse
Poject->Property->Resource->Text file encoding
手動輸入Big5
Reference:
http://www.pctartarus.com/?tid-1856/
Wednesday, February 9, 2011
[Ubuntu]VMWare/VMPlayer 64bit
在Ubuntu 64bit環境下如果在開啟VMPlayer 3.1或是VMWare 7.2有出現下列的錯誤訊息
解決方式如下
Reference:
https://answers.launchpad.net/vmware-ubuntu/+question/128677
http://pario.no/2010/10/02/installing-vmware-workstation-7-1-1-64-bit-on-ubuntu-10-10/
Oct 21 19:30:57.926: app-140240583857920| Log for VMware Workstation pid=6067 version=7.1.2 build=build-301548 option=Release
Oct 21 19:30:57.926: app-140240583857920| The process is 64-bit.
Oct 21 19:30:57.926: app-140240583857920| Host codepage=UTF-8 encoding=UTF-8
Oct 21 19:30:57.926: app-140240583857920| Logging to /tmp/vmware-root/setup-6067.log
Oct 21 19:30:58.063: app-140240583857920| modconf query interface initialized
Oct 21 19:30:58.064: app-140240583857920| modconf library initialized
Oct 21 19:30:58.104: app-140240583857920| Your GCC version: 4.4
Oct 21 19:30:58.112: app-140240583857920| Your GCC version: 4.4
Oct 21 19:30:58.126: app-140240583857920| Your GCC version: 4.4
Oct 21 19:30:58.148: app-140240583857920| Your GCC version: 4.4
Oct 21 19:30:58.163: app-140240583857920| Your GCC version: 4.4
Oct 21 19:30:58.207: app-140240583857920| Trying to find a suitable PBM set for kernel 2.6.35-22-generic.
Oct 21 19:30:58.212: app-140240583857920| Trying to find a suitable PBM set for kernel 2.6.35-22-generic.
Oct 21 19:30:58.215: app-140240583857920| Trying to find a suitable PBM set for kernel 2.6.35-22-generic.
Oct 21 19:30:58.218: app-140240583857920| Trying to find a suitable PBM set for kernel 2.6.35-22-generic.
Oct 21 19:30:58.221: app-140240583857920| Trying to find a suitable PBM set for kernel 2.6.35-22-generic.
Oct 21 19:30:58.244: app-140240583857920| Trying to find a suitable PBM set for kernel 2.6.35-22-generic.
Oct 21 19:30:58.247: app-140240583857920| Trying to find a suitable PBM set for kernel 2.6.35-22-generic.
Oct 21 19:30:58.250: app-140240583857920| Trying to find a suitable PBM set for kernel 2.6.35-22-generic.
Oct 21 19:30:58.252: app-140240583857920| Trying to find a suitable PBM set for kernel 2.6.35-22-generic.
Oct 21 19:30:58.255: app-140240583857920| Trying to find a suitable PBM set for kernel 2.6.35-22-generic.
Oct 21 19:30:58.262: app-140240583857920| Your GCC version: 4.4
Oct 21 19:30:58.276: app-140240583857920| Your GCC version: 4.4
Oct 21 19:30:58.319: app-140240583857920| Trying to find a suitable PBM set for kernel 2.6.35-22-generic.
Oct 21 19:30:58.321: app-140240583857920| Trying to find a suitable PBM set for kernel 2.6.35-22-generic.
Oct 21 19:30:58.324: app-140240583857920| Trying to find a suitable PBM set for kernel 2.6.35-22-generic.
Oct 21 19:30:58.327: app-140240583857920| Trying to find a suitable PBM set for kernel 2.6.35-22-generic.
Oct 21 19:30:58.329: app-140240583857920| Trying to find a suitable PBM set for kernel 2.6.35-22-generic.
Oct 21 19:30:58.336: app-140240583857920| Your GCC version: 4.4
Oct 21 19:30:58.347: app-140240583857920| Your GCC version: 4.4
Oct 21 19:30:58.406: app-140240583857920| Trying to find a suitable PBM set for kernel 2.6.35-22-generic.
Oct 21 19:30:58.410: app-140240583857920| Trying to find a suitable PBM set for kernel 2.6.35-22-generic.
Oct 21 19:30:58.413: app-140240583857920| Trying to find a suitable PBM set for kernel 2.6.35-22-generic.
Oct 21 19:30:58.416: app-140240583857920| Trying to find a suitable PBM set for kernel 2.6.35-22-generic.
Oct 21 19:30:58.418: app-140240583857920| Trying to find a suitable PBM set for kernel 2.6.35-22-generic.
Oct 21 19:30:58.614: app-140240583857920| Trying to find a suitable PBM set for kernel 2.6.35-22-generic.
Oct 21 19:30:58.615: app-140240583857920| Building module vmmon.
Oct 21 19:30:58.615: app-140240583857920| Extracting the sources of the vmmon module.
Oct 21 19:30:58.631: app-140240583857920| Building module with command: /usr/bin/make -C /tmp/vmware-root/modules/vmmon-only auto-build SUPPORT_SMP=1 HEADER_DIR=/lib/modules/2.6.35-22-generic/build/include CC=/usr/bin/gcc GREP=/usr/bin/make IS_GCC_3=no VMCCVER=4.4.5
Oct 21 19:31:02.123: app-140240583857920| Failed to compile module vmmon!
Oct 21 19:31:04.853: app-140240583857920| Trying to find a suitable PBM set for kernel 2.6.35-22-generic.
Oct 21 19:31:04.858: app-140240583857920| Trying to find a suitable PBM set for kernel 2.6.35-22-generic.
Oct 21 19:31:04.861: app-140240583857920| Trying to find a suitable PBM set for kernel 2.6.35-22-generic.
Oct 21 19:31:04.864: app-140240583857920| Trying to find a suitable PBM set for kernel 2.6.35-22-generic.
Oct 21 19:31:04.867: app-140240583857920| Trying to find a suitable PBM set for kernel 2.6.35-22-generic.
Oct 21 19:31:04.874: app-140240583857920| Your GCC version: 4.4
Oct 21 19:31:04.887: app-140240583857920| Your GCC version: 4.4
Oct 21 19:31:04.961: app-140240583857920| Trying to find a suitable PBM set for kernel 2.6.35-22-generic.
Oct 21 19:31:04.967: app-140240583857920| Trying to find a suitable PBM set for kernel 2.6.35-22-generic.
Oct 21 19:31:04.970: app-140240583857920| Trying to find a suitable PBM set for kernel 2.6.35-22-generic.
Oct 21 19:31:04.973: app-140240583857920| Trying to find a suitable PBM set for kernel 2.6.35-22-generic.
Oct 21 19:31:04.976: app-140240583857920| Trying to find a suitable PBM set for kernel 2.6.35-22-generic.
Oct 21 19:31:05.191: app-140240583857920| Trying to find a suitable PBM set for kernel 2.6.35-22-generic.
Oct 21 19:31:05.191: app-140240583857920| Building module vmmon.
Oct 21 19:31:05.191: app-140240583857920| Extracting the sources of the vmmon module.
Oct 21 19:31:05.213: app-140240583857920| Building module with command: /usr/bin/make -C /tmp/vmware-root/modules/vmmon-only auto-build SUPPORT_SMP=1 HEADER_DIR=/lib/modules/2.6.35-22-generic/build/include CC=/usr/bin/gcc GREP=/usr/bin/make IS_GCC_3=no VMCCVER=4.4.5
Oct 21 19:31:06.957: app-140240583857920| Failed to compile module vmmon!
解決方式如下
cd /tmp<br />wget http://www.sputnick-area.net/scripts/vmware7.1.1-patch-kernel-2.6.35.bash<br />sudo chmod +x vmware7.1.1-patch-kernel-2.6.35.bash<br />sudo ./vmware7.1.1-patch-kernel-2.6.35.bash<br />
vmware-modconfig --console --install-all<br />
Reference:
https://answers.launchpad.net/vmware-ubuntu/+question/128677
http://pario.no/2010/10/02/installing-vmware-workstation-7-1-1-64-bit-on-ubuntu-10-10/
Tuesday, February 8, 2011
[News]Lotus Symphony 3 and fix pack released
http://symphony.lotus.com/software/lotus/symphony/home.nsf/home
Download link for Ubuntu
Installation for 64bit
Download link for Ubuntu
Installation for 64bit
[Ubuntu]增進系統效能-ck patch
Ubuntu在每次改版後,效能一直都在提昇,但仍然有高手可以讓效能再提高,其中一種是由Con Kolivas修改核心,加入BFS提升桌面操作的效能,一般稱為ck patch。
修改方式如下
1.加入套件庫(add to repository)
2.安裝(Install)
Reference:
http://ubuntuforums.org/showthread.php?t=1474904
https://launchpad.net/~chogydan/+archive/ppa
http://users.on.net/~ckolivas/kernel/
Ubuntu 11.04 Natty 手動Compile kernel
http://parabing.com/2011/04/28/ubuntu-natty-a-custom-kernel-is-what-you-want/
http://blog.csdn.net/Yao_GUET/archive/2011/03/21/6265731.aspx
修改方式如下
1.加入套件庫(add to repository)
sudo add-apt-repository ppa:chogydan/ppa && sudo apt-get update
2.安裝(Install)
sudo apt-get install linux-image-generic-ck linux-headers-generic-ck
Reference:
http://ubuntuforums.org/showthread.php?t=1474904
https://launchpad.net/~chogydan/+archive/ppa
http://users.on.net/~ckolivas/kernel/
Ubuntu 11.04 Natty 手動Compile kernel
http://parabing.com/2011/04/28/ubuntu-natty-a-custom-kernel-is-what-you-want/
http://blog.csdn.net/Yao_GUET/archive/2011/03/21/6265731.aspx
Thursday, December 2, 2010
[Ubuntu]燒錄DVD影片及選單(Burn/make video DVD from files with DVD menus)
在Ubuntu下要把影片檔做出可以在DVD播放機上可以播放的DVD影片光碟,目前沒有單一工具可以完成,但可以依下列方式達到
1.轉檔(Convert video files to DVD video type)(說明)
3.1 (Media)
將tmp_folder/VIDEO_TS目錄 中之.vob檔案加入KMediaFactory之專案中(Add vob files in tmp_folder/VIDEO_TS to KMediaFactory project)
3.2 (Template)
選擇Menu範本(choose menu template)
3.3 (Output)
選擇輸出方式,可直接使用k3b燒錄,按右下角的start即可開始製作了
(You can choose k3b to burn DVD disc or image file)
批次轉檔可以使用下列script(Using following script to batch converting files )
1.轉檔(Convert video files to DVD video type)(說明)
ffmpeg -i example.mpg -target ntsc-dvd example.avi2.產生DVD影片目錄格式至tmp_folder內(Generate DVD VIDEO_TS/AUDIO_TS folder and .vob file)
dvdauthor -o tmp_folder -t example.avi3.使用KMediaFactory製作DVD選單及使用k3b燒錄(Using KMediaFactory to make DVD menu and burn DVD with k3b)
3.1 (Media)
將tmp_folder/VIDEO_TS目錄 中之.vob檔案加入KMediaFactory之專案中(Add vob files in tmp_folder/VIDEO_TS to KMediaFactory project)
3.2 (Template)
選擇Menu範本(choose menu template)
3.3 (Output)
選擇輸出方式,可直接使用k3b燒錄,按右下角的start即可開始製作了
(You can choose k3b to burn DVD disc or image file)
批次轉檔可以使用下列script(Using following script to batch converting files )
#!/bin/bash
for f in *.DAT; do ffmpeg -i "$f" -target ntsc-dvd "$f.avi"; done
for f in *.avi; do dvdauthor -o dvd -t "$f"; done
Thursday, October 21, 2010
[Ubuntu]10.04升級10.10無法出現登入畫面及桌面(Nvidia VGA)
使用Nvidia vga卡由10.04升級到10.10後,開機的splash畫面後就無法顯示登入的畫面,直接顯示console的登入介面,解決方式為
1.修改/etc/X11/xorg.conf
Section "Device"
Identifier "Device0"
Driver "nvidia"
VendorName "NVIDIA Corporation"
BoardName "Quadro NVS 285"
EndSection
修改為
Section "Device"
Identifier "Device0"
Driver "nv"
VendorName "NVIDIA Corporation"
BoardName "Quadro NVS 285"
EndSection
2.移除xserver-xorg-video-nv套件
sudo apt-get remove xserver-xorg-video-nv
3.重新compile Nvidia driver
4.將xorg.conf修改回用nvidia driver
Section "Device"
2.移除xserver-xorg-video-nv套件
sudo apt-get remove xserver-xorg-video-nv
3.重新compile Nvidia driver
4.將xorg.conf修改回用nvidia driver
Section "Device"
Identifier "Device0"
Driver "nvidia"
VendorName "NVIDIA Corporation"
BoardName "Quadro NVS 285"
EndSection
Wednesday, October 13, 2010
[Ubuntu]移除文字檔中Windows的換行符號(dos2unix missing after Ubunut 10.04)
在一般的GNU/Linux系統中有一個dos2unix的小工具可以移除文字中Windows使用的換行符號,但在Ubuntu 10.04後dos2unix就不見了,要用另一個小工具來達到相同的效果。
1.安裝tofrodos
sudo aptitude install tofrodos
2.使用方法
fromdos FILENAME
1.安裝tofrodos
sudo aptitude install tofrodos
2.使用方法
fromdos FILENAME
Sunday, October 3, 2010
[Ubuntu]10.10將會使用新的字型
在10.10版中,Canonical公司特別為了Ubuntu開發了新的字型,以往在GNU/Linux系統上最為人詬病的問題之一就是使用者介面沒有Windows或Mac的漂亮,而在使用者界面中文字的顯示又是主要的一個影響因素,因此Canonical找 Dalton Maag 合作開發新的字型,讓Ubuntu的使用者介面可以看起來更美觀。如果要一睹為快可以到此看一下新的字型。
Monday, August 30, 2010
[Ubuntu]多台PC共用一組鍵盤滑鼠-Synergy
一般要共用鍵盤滑鼠必須要買KVM來共享螢幕、鍵盤和滑鼠,但如果你只要共用鍵盤和滑鼠,則可以用軟體來達成,Synergy這套軟體就可以達到這樣的功能,免費且又是跨平台的,在Windows下只要安裝好,就有介面可以設定了,在Mac/Unix/Linux下則要手動建立設定檔,設定方式如下
screen1 -->server(要分享鍵盤滑鼠的電腦)
screen2 -->client(要使用鍵盤滑鼠的電腦)
兩台電腦螢幕的擺放位置如下(與Sever設定檔之section: links有關)
screen2 screen1
左 右
Server端:
1.建立設定檔 ex. synergy.conf
注意:在section:screens中之screen1要與該電腦之Hostname相同
---------------------------------
section: screens
screen1:
screen2:
end
section: aliases
screen1:
192.168.1.1
screen2:
102.168.1.2
end
section: links
screen1:
left = screen2
screen2:
right = screen1
end
----------------------------------
2啟動Server
-前景啟動
synergys -f --config synergy.conf
-背景啟動
synergys --config synergy.conf
3.啟動Client
-前景啟動
synergyc -f server-host-name
synergyc -f server-ip-address
-背景啟動
synergyc server-host-name
synergyc server-ip-address

Sunday, June 6, 2010
[Ubuntu]如何用k3b燒錄VCD/DVD
How to make VCD/DVD with k3b?
1.安裝ffmpeg(Install ffmpeg)
sudo apt-get install ffmpeg
2.轉換檔案格式(Convert format of Video files)
VCD-(352x240)
ffmpeg -i test.avi -target ntsc-vcd result.avi
DVD(720x480)
ffmpeg -i test.avi -target ntsc-dvd result.avi
3.安裝vcdimager(Install vcdimager)
sudo apt-get install vcdimager
4.開啟k3b建立VCD/DVD專案進行燒錄(Create VCD/DVD project in k3b to burn)
Friday, April 30, 2010
[Ubuntu]10.04安裝(install) NVidia Driver
在9.10版時,從NVidia下載的Driver需要做patch,在10.04也需要做同樣的動作,可參考[Ubuntu] 9.10 安裝(install) Nvidia driver,但在執行安裝script時需加上-k $(uname -r)之參數
ex: sudo ./NVIDIA-Linux-x86-185.18.14-pkg1-custom.run -k $(uname -r)
如果你是從9.10版升級到10.04,在執行安裝NVidia的driver後還是一直會有載入錯誤的訊息,如果還是在使用grub,解決方式為使用grub2,方式如下
1. 移除grub
2. 安裝grub-pc和grub2
重新開機後,NVidia顯示卡就可以正常運作了
If your ubuntu 10.04 upgraded from 9.10, and you still get message like "failed to load nvidia". If you still use "grub", you can remove "grub" and install "grub-pc" and "grub2".
[Ubuntu]10.04 iBus 行列輸入法當機問題解決方案
Ubuntu由9.10升級至10.04後,發現在使用iBus的行列輸入法會有讓應用程式當機的狀況出現,後來發現只要重新compile一次source code就沒問題了,可參考[Ubuntu]ibus輸入法加入完整的行列輸入法中之使用原始碼編譯的方法即可。
Monday, January 25, 2010
[Ubuntu] 9.10 install Nvidia driver
After upgrading to 9.10, kernel version is 2.16.31.1x. If you want to install Nvidia official driver, you'll get some error messge, and can't complete it. I found the bin file that need to be patched. The following is the steps:
1. Go to Nvidia site to download driver (version: 185.18.14)
2. Download the Script and save it in the same location of driver(right click to save it.)(filename:nvidia-185.18.14.patch)
3. Open Terminal and go to the location of downloaded driver. Execute the following command
./NVIDIA-Linux-x86_64-185.18.14-pkg2.run --apply-patch nvidia-185.18.14.patch
then will generate a new file , the name is like NVIDIA-Linux-x86_64-185.18.14-pkg2-custom.run
4. Install patched Nvidia driver
4.1 ctrl+alt+F1
4.2 shutdown X window
sudo /etc/init.d/gdm stop
4.3 run the driver installer
sudo ./NVIDIA-Linux-x86_64-185.18.14-pkg2-custom.run
4.4 Start X window
sudo /etc/init.d/gdm start
Tuesday, January 5, 2010
[Ubuntu]磁碟管理工具(fdisk)
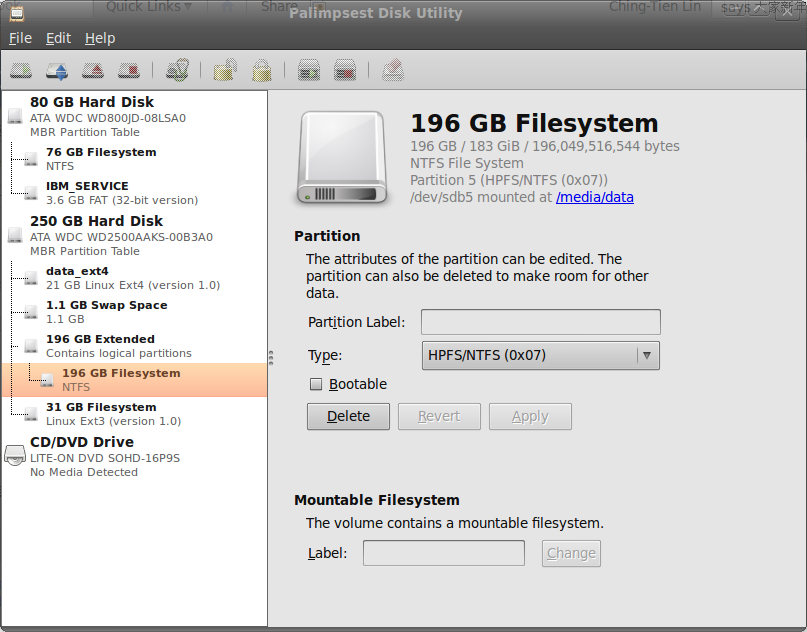
在Ubuntu下除了以前介紹的GParted外,現在在系統(System)->管理(Administration)->磁碟工具(Disk Utility)
也可以進行fdisk的動作,在磁碟工具中可以進行分割區(Partition)的建立(create)、刪除(delete)、格式設定(ext3,ext4,ntfs等),待動作完成後,可至電腦(Computer)中在磁碟機(Driver)上按右鍵(right click),選擇格式化(format)即可完成新磁碟機的所有動作了。
[Ubuntu]備份及還原(Backup and Restore) Ubuntu system
在Windows的世界大家都會想到用 ghost或clonezilla去備份整個作業系統,在Ubuntu有下列兩個方式可以參考
1.使用tar指令(適用於所有的Linux系統)
http://ubuntuforums.org/showthread.php?t=35087
2.使用Sbackup套件
http://www.debianadmin.com/backup-and-restore-your-ubuntu-system-using-sbackup.html

1.使用tar指令(適用於所有的Linux系統)
http://ubuntuforums.org/showthread.php?t=35087
2.使用Sbackup套件
http://www.debianadmin.com/backup-and-restore-your-ubuntu-system-using-sbackup.html
Subscribe to:
Posts (Atom)